 Русский
 English
 19 September 2013
How to Create Analogue Clocks in iRidium GUI Editor
Sergey Smirnov
Script programmer at iRidium mobile
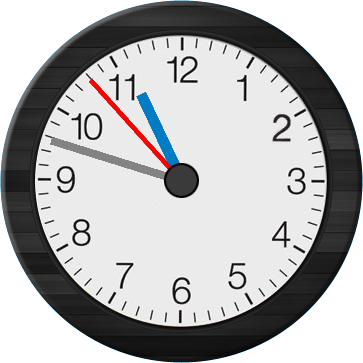
The article presents step-by-step instructions on how to create an analogue clock in iRidium GUI Editor. To do it you need the installed iRidium Environment, some basic knowledge of iRidium GUI Editor and iRidium Script scenes. There are 6 steps on the whole:
- Creation of the clock face
- Creation of the second hand
- Creation of the minute hand
- Creation of the hour hand
- Fixing the hands together
- Starting the clock
At the end of this article you can find a list of used Editor items and the archive with the ready-for-work project.
Creation of the clock face
1. Create an item – the clock face - with the following properties:
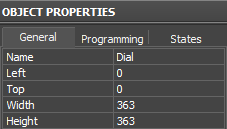 Name: Dial
Left: 0
Top: 0
Width: 363
Height: 363
The rest properties are by default.
2. Set up the item appearance:
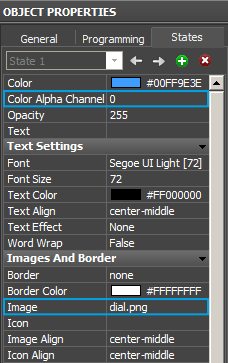 Color Alpha Channel:
The property regulates the transparency of the item background. Make the background transparent, indicate 0.
Image:
Set the clock face image dial.png on the graphic item.
The image can be taken from the archive with the ready project:.
States:
Remove the second item state.
Creation of the second hand:
1. Create an item – the second hand - with the following properties:
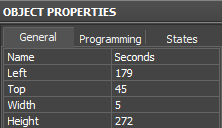 Name: Seconds
Left: 179
Top: 45
Width: 5
Height: 272
The rest properties are by default.
2. Theory:
At any moment the clock hand has a position defined as an angle of turning inside the clock face. Each item has an Angle property which enables turning of the item.
Problem: The characteristic feature of the Angle property is a fixed point of turning located in the item center. For the clock hand the point of turning is its lower part.

Solution: The background of the hand item will be transparent and the image set on this item will be equal to half the item height. As a result, only half the item will be seen and the lower part of the hand will be in the item center. That will create the correct turning angle.
3. Set up the item appearance::
 Color Alpha Channel:
The property regulates the transparency of the item background. Make the background transparent, indicate 0.
Image:
Set the clock face image Seconds.png for the graphic item.
The image can be got from the archive with the ready project.
Image Align:
The image Seconds.png has smaller height than the item. In order to attach the image to the upper part of the item indicate top-middle.
States:
Remove the second item state.
4. Calculations:
Each minute has 60 seconds. Therefore the second hand has 60 positions on the clock face. In one minute the second hand turns 360 degrees. Hereof, the number of positions is less than the number of degrees. It means the second hand moves from one position to another with a particular step.
To calculate the step it is required to know the ratio of the number of degrees to the number of positions in one full turning: 360 / 60 = 6. The second hand moves with step 6.
The Seconds system variable returns the value from 0 to 59, where each of the values corresponds to one of the 60 positions of the hand.
The turning angle forfor the second hand is Seconds * 6
To turn the second hand, write the turning angle in the Angle property of the item.
5. Write a script to turn the second hand:

// Clock type, as the value instead of item_Seconds the identifier
// of the second hand item is used
function iRidium_Clock(item_Seconds)
{
// Function of turning the second hand
function CurrentTime()
{
// Writing the value of the current number of seconds in the Seconds variable
var Seconds = IR.GetVariable("System.Time.Seconds");
// Calculating the turning angle for the second hand Seconds * 6
// and writing this value in the Angle property of the item
item_Seconds.Angle = Seconds * 6;
}
// Turning of the second hand each 1000 ms
IR.SetInterval(1000, CurrentTime);
};
// Create the clock instance where instead of item_Seconds we receive the item identifier
var iRidium_Clock_1 = new iRidium_Clock(IR.GetItem("Page 1").GetItem("Seconds"));

Note that in the last string the receipt of the item identifier consists of two parts:
- "Page 1" – name of the page with the second hand item. Check if you have the same page name. If you have a different page name you should write it instead of "Page 1".
- "Seconds" – the name of the second hand item
Creation of the minute hand:
1. Create an item - the minute hand - with the following properties:
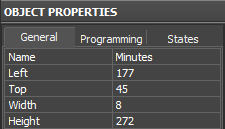 Name: Minutes
Left: 177
Top: 45
Width: 8
Height: 272
The rest properties are by default.
2. 2. Set up the item appearance:
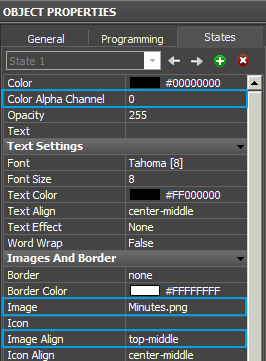 Color Alpha Channel:
The property regulates the transparency of the item background. Make the background transparent, indicate 0.
Image:
Set the clock face image Minutes.png on the graphic item.
The image can be taken from the archive with the ready project.
Image Align:
The image Minutes.png has smaller height than the item. In order to attach the image to the upper part of the item indicate top-middle
States:
Remove the second item state.
3. Calculations:
The turning of the minute hand is calculated similarly to the one of the second hand. The minute hand has 60 positions and moves with the step 6. The Minutes system variable returns the value from от 0 to 59, where each of the values corresponds to one of the 60 positions of the hand.
Minutes * 6
But every second the minute hand makes a small step to the new position. So each position of the minute hand has 60 smaller positions in it. And in one second the minute hand moves to one smaller position.
As it was mentioned before, the Seconds system variable returns the position of the second hand. But to make it smaller we have to mark it down:
Seconds / 10
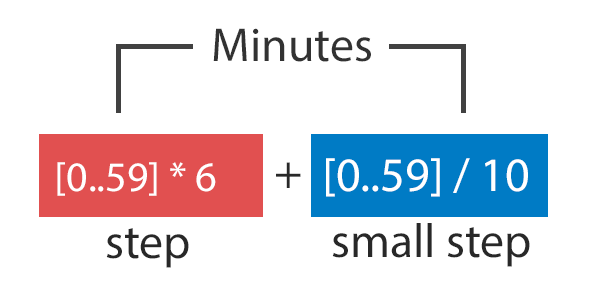
The turning angle for the minute hand isMinutes * 6 + Seconds / 10;
To turn the minute hand, write the turning angle in the Angle property of the item.
4. Write a script to turn the minute hand:
// Clock type, as the values, instead of item_Seconds and item_Minutes the identifiers
// of the second and minute hand items are used
function iRidium_Clock(item_Seconds, item_Minutes)
{
// Function of turning the second and minute hands
function CurrentTime()
{
// Writing the value of the current number of seconds in the Seconds variable Seconds
var Seconds = IR.GetVariable("System.Time.Seconds");
// Writing the value of the current number of minutes in the Minutes variable Minutes
var Minutes = IR.GetVariable("System.Time.Minutes");
// Calculating the angle of turning the second hand Seconds * 6
// and writing this value in the Angle property of the item
item_Seconds.Angle = Seconds * 6;
// Calculating the turning angle for the minute hand Minutes * 6 + Seconds / 10 Minutes * 6 + Seconds / 10
// and writing this value in the Angle property of the item
item_Minutes.Angle = Minutes * 6 + Seconds / 10
}
// Turn the second and minute hand each 1000 ms
IR.SetInterval(1000, CurrentTime);
};
// Create the clock instance and receive identifiers of the Seconds and Minutes items Seconds и Minutes
var iRidium_Clock_1 = new iRidium_Clock(IR.GetItem("Page 1").GetItem("Seconds"),IR.GetItem("Page 1").GetItem("Minutes"));
Note that that in the last string the receipt of the item identifiers consists of two parts:
- "Page 1" – the name of the page with the second hand item. Check if you have the same page name If you have a different page name you should write it instead of "Page 1".
- "Seconds" – the name of the second hand item
- "Minutes" – the name of the minute hand item
Creation of the hour hand:
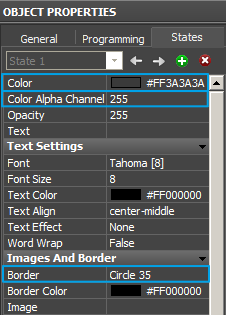
1. Create an item - the hour hand - with the following properties:
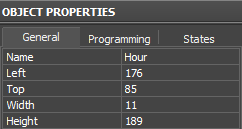 Name: Hour
Left: 176
Top: 85
Width: 11
Height: 189
The rest properties are by default.
2. Set up the item appearance:
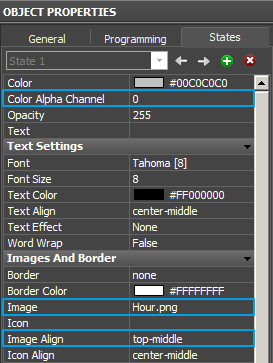 Color Alpha Channel:
The property regulates the transparency of the item background. Make the background transparent, indicate 0.
Image:
Set the clock face image Hour.png on the graphic item.
The image can be taken from the archive with the ready project.
Image Align:
The image Hour.png has smaller height than the item. In order to attach the image to the upper part of the item indicate top-middle.
States:
Remove the second item state.
3. Calculations:
The Hour system variable returns a value in the range from 0 to 11. Each value corresponds to one of the 12 positions of the hour hand. Another number of positions means another step of moving.
360 / 12 = 30, the hour hand moves with step 30.
Hour * 30
All other calculations are performed similarly to the ones for the minute hand.
Minutes / 10
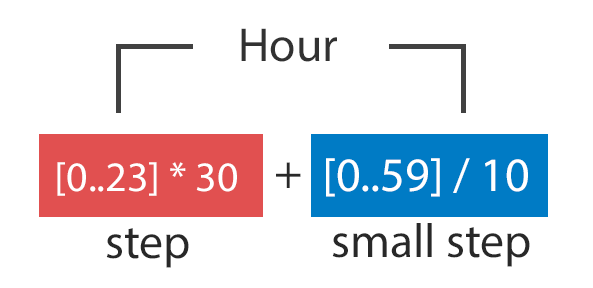
The turning angle for the minute hand is Hour * 30 + Minutes / 10;
To turn the hour hand, write the received value in the Angle property of the item.
4. Write a script to turn the hour hand:
// Clock type, as values, instead of item_Seconds, item_Minutes, item_Hour identifiers
// of the second, minute and hour hand items are used
function iRidium_Clock(item_Seconds, item_Minutes, item_Hour)
{
// Function of turning all hands
function CurrentTime()
{
// Writing the value of the current number of seconds in the Seconds variable
var Seconds = IR.GetVariable("System.Time.Seconds");
// Writing the value of the current number of minutes in the Minutes variable
var Minutes = IR.GetVariable("System.Time.Minutes");
// Writing the value of the current number of hours in the Hour variable
var Hour = IR.GetVariable("System.Time.Hour");
// Calculating the turning angle for the second hand Seconds * 6
// and writing this value in the Angle property of the item
item_Seconds.Angle = Seconds * 6;
// Calculating the turning angle for the minute hand Minutes * 6 + Seconds / 10
// and writing this value in the Angle property of the item
item_Minutes.Angle = Minutes * 6 + Seconds / 10;
// Calculating the turning angle for the hour hand Hour * 30 + Minutes / 10
// and writing this value in the Angle property of the item
item_Hour.Angle = Hour * 30 + Minutes / 10;
}
// Turning all hands each 1000 ms
IR.SetInterval(1000, CurrentTime);
};
// Create the clock instance and receive identifiers of all hands
var iRidium_Clock_1 = new iRidium_Clock(IR.GetItem("Page 1").GetItem("Seconds"),IR.GetItem("Page 1").GetItem("Minutes"),IR.GetItem("Page 1").GetItem("Hour"));
Note that in the last string the receipt of each item identifier consists of two parts:
- "Page 1" – the name of the page with the second hand item. Check if you have the same page name. If you have a different page name you should write it instead of "Page 1".
- "Seconds" – the name of the second hand item
- "Minutes" – the name of the minute hand item
- " Hour" – the name of the hour hand item
Fixing the hands together:
1. Create an item - the mount for the hands - with the following properties:
 Name: Mount
Left: 164
Top: 163
Width: 35
Height: 35
The rest properties are by default.
2. Set up the item appearance:
 Color: Set up the item color #FF3A3A3A
(R: 58 G:58 B:58)
Color Alpha Channel:
The property regulates the transparency of the item background. Now we need non-transparent background, indicate 255.
Border: The item should be round, so indicate Circle 35
Starting the clock:
Everything is ready and you can start the clock. Press F5 or button.

Used items:
- system variables System Tokens / Time: Hour, Minutes, Seconds
- the function for reading variables IR.GetVariable
- the Angle property of the item
- the function of performing commands with interval IR.SetInterval
- the function for receiving the item identifier IR.GetItem
- 5 graphic items
- 4 images: a clock face and 3 hands